Monday, November 19, 2012

The Wonders of Skype

Skype is one of those wonderful free tools that never ceases to amaze me. We have been skyping in my K classroom on a regular basis since 2008. Originally, we started using Skype as a way to connect with other classrooms and find out about their schools, daily lives, and cultures. The students and I were both so excited to have a window into another classroom! However, our calls were often kind of random with no specific purpose in mind. Just the experience of using skype and chatting with learners and teachers from around the world was enough for us.

That all changed when I attended a session entitled "Around the World in 80 Schools" in 2010 (Teacher 2 Teacher Conference in Bow Island, Alberta) with Silvia Rosenthal Tolisano. She shared how she turned a Skype call into a learning call in her classroom with important pre- and post-call activities, and a variety of roles assigned during the Skype call. Every learner in her classroom fulfilled an important function and numerous curricular outcomes were met whenever her classroom connected via Skype. Please click on this link to view this PDF file on turning a Skype call into a learning call--it's a great resource!

Although Silvia's model was a bit advanced for my junior and senior kindergarten students, it had a profound impact on how I wanted to infuse Skype into my students' learning. In the next couple of years, Skype became a mainstay in my technology toolbox. My colleague Leah Obach and I partnered on a number of collaborative projects involving Skype and other tools, such as:

Superheroes: my K class partnered with Leah's Grade 11 ELA class. First, all students used Big Huge Labs to create trading cards to introduce the students in both classes. The next step was to brainstorm the qualities of heroes and villains using a collaborative brainstorming tool, Cacoo.  My K students designed their own superheroes using paper and markers, and we photographed and posted them to our classroom blog. Each of Leah's students chose a superhero and wrote a short story for that superhero (lots of important lessons about audience, level of language, etc). They used the website Hero Machine to create a digital picture of each superhero, then narrated it with Audacity. Using Windows Movie Maker, the students created a digital story of each superhero. These digital stories were transferred to classroom iPods where they could be listened to over and over at a listening centre. The highlight of the project was the use of Skype. Each day, a different high school student skyped in for Skype Storytime. The student introduced him/herself then read the story to the students via Skype. My K students were so excited and engaged, especially when their superhero was being featured. It was a very successful project, providing students with a real audience and feedback for their work.

Digital Team Teaching with Skype: And then my colleague was transferred to Grade 1. We knew that it would be easy to find reasons to connect, but we wanted to take it to the next level. And digital team teaching was born. We began to use Skype (and occasionally Smart Bridgit) to connect our classrooms for actual learning experiences. Leah and I took turns leading these learning experiences via Skype while the other teacher supported. Kindergarten learning experiences often provided important practice and review for Grade 1 students, while activities from Grade 1 stretched and enriched my kindergarten students. Math games and story problems worked especially well for digital team teaching using the screen sharing feature. This project is ongoing, with the goal of small groups of students skyping into the other classroom as a means of differentiating instruction.

And today, we skyped with a junior kindergarten class from the Mandell School in New York City. They located us on Skype in the Classroom, and contacted us to see if we would be interested in working on communities outcomes from the social studies curricula. It was a perfect fit for us. Have a look at some of the slides we created to share with our New York friends.


Our questions and the answers we found out:


Monday, November 12, 2012

Animal Rescue Comes to Kindergarten!

My student teacher, Miss Lobreau has been involved in our collaborative project, Little Hands, Big World, since the beginning of her student teaching placement. Although this is her first placement, she was eager to plan an integrated thematic unit, and we decided that animal rescue/pets would be very timely and an excellent fit with our collaborative project.

Integrating outcomes from social studies, mathematics, and ELA, as well as descriptors from Manitoba Education's Literacy with ICT continuum, Miss Lobreau has planned an exciting and engaging unit with strong links to ESD and social responsibility. She taught her introductory lesson today--take a look at this learning experience!

Table Graffiti: Megan covered the students' tables with brown paper and divided each table in half. After providing photographic examples of graffiti on the Smartboard, the students were given the opportunity to create their own graffiti on their tables. After ten minutes of drawing and printing words about their pets and their needs, students participated in a gallery walk. The next 15 minutes were spent at the Smartboard in our classroom.

Animal and Human Needs Smart Notebook lesson (sourced from Smart Exchange then modified).

Animal Needs Sorting Activity
Students applied their learning by completing this cut and paste sorting activity:

Animal Needs Sorting Worksheet
Later in the morning, Miss Lobreau developed important numeracy skills with this graphing activity on the Smartboard.

Dogs and Cats Graphing Activity for Smartboard

Stay tuned to see how our kindergarten students will apply their learning to make a difference for animals who need homes! This afternoon, we are excited to welcome a cat breeder of Ragdoll-Himalayans to our classroom!

Thursday, September 27, 2012

On a Roll with Dice Games!

I had a fabulous day with my kindergarten PLC (professional learning community) on Monday. Our topic was math games for developing early numeracy skills. One teacher in our group did a wonderful job of collecting and sharing a wealth of dice games. I was eager to return to my classroom and try them out, and my students absolutely loved the first two games! I have created SMART Notebook files for the games as well as actual game boards.

Tug of War
To create paper game boards: cut a long strip of heavy construction paper. Place a large sticker in the middle, and equally spaced smaller stickers on each side (as many as you like depending on students/skills being practiced, but use at least 5 on each side). Students play in pairs, with each student sitting at one end of the game board. Depending on the age of the students/skills you are working on, you can use 6, 8, or 10 sided dice or spinners. An object is placed in the middle of the game board on the larger sticker. The first player rolls/spins, and moves the object that many spaces towards him/her. The second player rolls/spins, and moves the object that many spaces back towards him or her. Play continues until one player has the object right in front of him/her on the closest sticker. My rule is that to win, students must roll the exact number of spaces they need.

In my classroom, we first watched a YouTube video showing a tug of war, as my five year-olds weren't certain about what a tug of war looked like. Next, we played this game on the SMART Board (see files below), with the teacher and special helper playing against the rest of the class. I have included two versions of the game board. More spaces could be added on each side, and a 10 sided-die could be used from the gallery in SMART Notebook.

Once students were confident playing the game, we played in partners using our paper game boards. Lastly, we skyped our partner class and taught them the game. We challenged them to a tug of war, using SMART Bridgit for interactive play.

Tug of War SMART Notebook File

Tug of War Game Board 2 SMART Notebook File

Race to Trace
This game focuses on rolling a die and identifying the dot pattern or number, then correctly tracing that number. The first player to have all of his/her numbers traced wins. If the student rolls a number that has already been traced, I decided that he/she would choose a different colour and re-trace the number (creating a "rainbow" number, for additional practice). The happy faces indicate where the student should start printing the number. I have cloned this game board, and if you select dual page view in SMART Notebook, you will have two game boards side by side. The special helper and I played against the rest of the kindergarten class. Then, I printed out copies of the game boards and the students played against each other. This was another popular game, and a great way to practice correct number formation as well as identifying dot patterns on a die.

My plan is to introduce two new games per day until we have 6 games that we can play. These games will then become math centres, enabling me to work with small groups of students while the rest are engaged and having fun with these dice games.
Race to Trace SMART Notebook File

Monday, May 21, 2012

Staying Organized with Clipboards

When I first started teaching Grades 1 and 2, students had a coil-bound agenda that was used as a home-school communication tool. Every day, my students copied a message off the whiteboard, took their agenda home, and their parents initialed it and returned it to school. There was a reading log in the back and a plastic pocket in the front for sending notes and money. Then my teaching assignment changed, and the agendas didn't work so well anymore!

The agendas had already been ordered by the time I found out that I was teaching kindergarten, so I was stuck with them for a year. At ages 4 and 5, my students were incapable of copying off a whiteboard to print a message. This meant that if I wanted a message to go home, I needed to photocopy it or print it myself in each agenda! I soon decided that next year I would find a better option.

After talking to other kindergarten teachers, I decided to try using clipboards. I purchased two-sided clipboards (that open like a book) with a plastic pocket on one side and a clipboard on the other. The plastic pocket has been useful for sending notes and money back and forth, and the actual clipboard holds the weekly sheet. I printed each student's name on the front of their clipboard, then began experimenting with weekly clipboard sheets. I finally settled on a winning format, and I have been using them for three years now.

Created in Microsoft Publisher, there is a title at the top of the sheet reading "Mrs. Caldwell's Kindergarten Classroom, The Week of ________". There is an individual box for each school day with the date and a spot to check off after school transportation (walk, bike, bus, pick up by ______) and the child's attendance. Special activities for the day are listed in the box. My contact information is included on every sheet, and sometimes I do a sidebar listing coming events, units of study, useful websites, and skills to practice at home. I decorate the clipboard sheets with seasonal clipart or photographs of the students. On the left side of the clipboard, above the plastic pocket, is where I tape our alpha bag chart (see previous post). Check out this sample. My students only attend kindergarten on full alternate days, so this sample shows a Tuesday/Thursday week.
When students arrive at school, they hand in their clipboards. It goes in a special basket on the counter, and there are additional baskets for home reading bags and library books. I check clipboards first thing in the morning, jotting down important items on sticky notes to remember for later. Clipboards have proven to be an indispensable tool for communicating with parents and staying organized, and parents love them too!

Monday, May 14, 2012

Alpha Bags: Simple and Effective!

Since attending a kindergarten workshop several years ago (Jana Oleson, 2009, Brandon Teachers' Association LIFT Conference), I have been using alpha bags to provide additional practice with letters, their sounds, and objects that begin with that sound. They're very simple and effective, and kids and their families love them! Here's how alpha bags work:
-parent letter explaining alpha bags
-I create 26 bags (one for each letter of the alphabet) as well as sh, ch, and th
-a large freezer bag is used. Each bag contains the following items: Letterland flashcard, a PM letter book, and a foam letter that pops out for tracing.

Every night, each student takes home a different alpha bag. An alpha bag chart is taped into the front of the students' clipboard and is used to track what bags have been taken home. Once the student takes home the alpha bag, he works with his parent to practice the letter and its sound and read the letter book. Then, the child and his parent add a small item or picture that begins with the letter. The picture above shows some of the items that have been added to the K bag: a picture of ketchup, a Kool-Aid label, and a key. Students and parents understand that objects added to the bags may not be returned.

The next kindergarten morning, students place their completed alpha bag at their table spot. After circle time, they have the opportunity to share what they added the previous night. Each student tells us the letter she has. We practice the letter sound and its action. We also identify if it is a lip popper, tip tapper, etc. from the Lindamood LiPS program. The student shares the object/picture that she added to the bag, and we check to make sure it begins with that sound. It takes approximately one minute per bag to share, and it is time well spent. The families and I notice a huge improvement in students' letter-sound knowledge in the months we do alpha bags.

Wednesday, May 2, 2012

Student Services Forum Presentation

My presentation at the annual Student Services Conference, SMARTer with Technology: Effective ICT Infusion in the Early Years Classroom

Session Description:
How can technology engage students and enhance learning in the early years classroom? Session participants will explore actual learning experiences and work samples, web-based resources and tools, and age-appropriate hardware and software to answer this question. ICT infusion is for learners of all ages and abilities!

Introduction

Aven's Corner The Name Game
Poll Everywhere
Goodnight 21st Century Learners: a window into my classroom
Today's Meet: backchannel site used in the presentation

Technology for Procedures
The Hat: a free download, this tool randomly draws individual and pairs of names
Kindergarten Calendar (available for download from my Google Documents account)
Centre workboard created in SMART Notebook
Evernote: assessment, student portfolios, work samples
Social stories (for example: morning routine and swimming lessons) can be created using a digital camera and Photo Story, Microsoft PowerPoint, or MovieMaker

Technology for Communication
Phonevite
Twitter for classroom use
Twitter for professional learning and sharing
Kinderchat
Classroom Facebook page (created as a "secret group")
Using your smart phone in the classroom
Skype: video conference with community helpers, experts, authors, and other classrooms

Technology for Collaboration
Digital Team Teaching: Kinecting Classrooms for Sustainability
Skype Play

Flipped Classroom
-recorded lessons (sometimes teacher-created, other times student and teacher-created) of important concepts for preview, review, and family involvement in learning
-shared via classroom YouTube channel, iPod Nanos, Facebook page, email links
-enables students to learn and practice basic concepts at home, teacher can use classroom time to differentiate (enrich, remediate, etc)
-family directions for using an iPod Nano
-interesting article

iPads
I Touch for Special Needs
Sesame Street video: There's an App for That

Some of My Favourite Resources
-follow this link to my Diigo list

Work Samples

Tuesday, May 1, 2012

3-D Objects: Lesson Ideas

Shapes are often a fun break from the more serious business of learning about numbers in kindergarten math! For the next week, we are focusing on 2-D shapes and 3-D objects. My student teacher led our first 3-D objects learning experience today, and I thought that I would devote this blog post to sharing some of our favourite resources.

Created in SMART Notebook, this activating activity uses the screen shade to cover drawings of 3-D objects. We reveal the object slowly, taking guesses as more is revealed. Students are able to guess and check. Or, we quickly flash the 3-D object to the students and see if they can name it. This also makes a great centre activity. Included at the end of this activity is a link to an excellent Brain Pop Junior video on 3-D objects. This site requires a subscription, but 30 day trials are available. Brain Pop Junior and Brain Pop is a fabulous resource for all subject areas.

Two years ago, I attended a Harvey Almarode session at an ed tech conference in Alberta. He specializes in designing SMART Notebook math resources--his session was excellent and so are his resources. All of them are free to download and can easily be adapted for your own classroom and students. Please follow this link to his geometry resources.

Other 3-D objects lesson ideas:
Which shape is missing?: line up 3, 4, or 5 3-D objects. Students cover their eyes while the teacher or a helper hides one. Which shape is missing? Works well for developing 3-D object vocabulary. This can be done on the SMART Board as well, hiding the 3-D object under something.
Shape Hunt Around the School/Playground: photograph with a digital camera, import into SMART Notebook, use the pens to trace edges, circle vertices, etc. Label the parts of the object. For a centre activity, drag the labels off to the side of each photograph and have students drag them to re-label.
3-D Object Show and Tell: send a note home to parents, asking students to bring a 3-D object to school (such as a can of soup, tube of lipstick, etc). Using a document camera connected to your SMARTBoard, display each object for the entire class to see. Photograph each object using the document camera. These photographs can be used for sorting and labeling activities.
Constructing 3-D Objects from Marshmallows and Toothpicks: use a planning sheet to design the 3-D object and calculate how many marshmallows and toothpicks are needed to build a 3-D object.
3-D Object Mystery Bag: place a 3-D object in a bag. A student inserts his/her hand, describes what he/she feels, and names the 3-D object.

What would I do without YouTube and Mr. Harry's Kindergarten channel? The students and I love these two videos on 2-D shapes and 3-D solids.
2-D Shapes I Know
3-D Shapes I Know

Wednesday, April 25, 2012

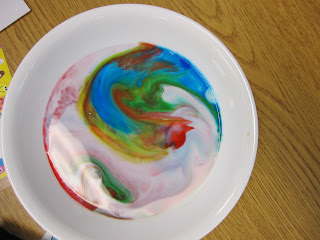
The Milky Rainbow

For our science cluster on colours, my student teacher and I did a lesson on primary and secondary colours and colour mixing. We decided that the ever-popular "Milky Rainbow" experiment would meet the outcomes nicely and it was a huge success! Check out our pictures below:


Following the experiment, we viewed pictures on the SMART Board of each group's milky rainbow. We used this Notebook slide to further explore colour mixing. This colour mixing game is excellent for a whole class activity or a play centre.

Beginning, Middle, and End

My student teacher taught a terrific lesson this morning in ELA on beginning, middle, and end. She began with the nursery rhyme "Humpty Dumpty" on word cards in the pocket chart. The students did shared reading of the nursery rhyme several times, then rebuilt the nursery rhyme in the pocket chart. Pictures from the nursery rhyme were sequenced and identified as beginning, middle, and end. Next, my student teacher read the book "Our Tree Named Steve" by Alan Zweibel. Here are some of the tools she used:

A Classic Sesame Street Video from YouTube on Beginning, Middle, and End

SMART Notebook file: Race Track for Beginning, Middle, and End
As the story progressed, the students moved the car from beginning, middle, to end. Pictures from the story were scanned and placed above beginning, middle, and end in the Notebook file.

Junior Kindergarten Beginning, Middle, End Response Sheet
Junior Kindergarten students drew a picture from the story, explained it to an adult, then circled beginning, middle, or end to indicate where their picture came from in the story.

Senior Kindergarten Beginning, Middle, End Response Sheet
Senior Kindergarten students drew a picture from each part of the story. They printed letters, words, and sentences to match their pictures.

Our Tree Named Steve